Startup Toolkit
Interactive How-To Guides For Startups
Crafted for you by Casual Team
Guide

PPC campaign

by
Valery Krasko
Head of PPC and PPA @ Netpeak
Get a pre-made project plan based on this how-to guide on startuptoolkit.info
Set up your first GoogleAdwords campaign with the least hassle involved. This guide will show you how to get affordable paid traffic for your company in the early days.

As usual, a detailed step by step project plan comes with each story. 

Do You Need Contextual Advertising?

Contextual advertising allows you to get relevant traffic (those people who are already interested in your product/service). Yet, a Pay Per Click (PPC) ad campaign doesn’t stand for a guaranteed sale. Your conversion rates will depend on your site’s usability, your unique value offer and competitors’ pricing and current promos.The main idea behind PPC is that you pay just for the clicks, meaning only for those times when a user saw your ad and interacted with it.Google AdWords allows you to create the following types of ads:1. Search ads campaigns – ads popping up in Google search results.2. Contextual media campaigns – ads displayed on the Google Display Network (Google AdSense publisher sites; other Google sites including Blogger, Gmail, YouTube etc.)

Map Out Your Strategy

Before you start planning your first campaign, you need to decide upon the main campaign goals. The bare minimum you should settle on is whether:
  • You want to increase your brand’s visibility.
  • You want to get sales.
However, it’s best to set up precise, measurable goals. For instance, grow a number of leads by 20%.This is a simple step, but it’s essential for mapping out and setting up your entire PPC campaign. You should ask yourself the following questions as well:
  • Is your product/service currently in demand?
  • What problem does your product solve?
  • How will users search for your product/service? (for example, do they know the correct product name?)

Scope The Competition

Finding the best keywords and writing catchy ad texts is not enough to attract potential clients. You should grab the user’s attention with a unique solution to their problem and make it sound better than the competitor’s offer. Hence, you need to know what’s your competition is up to in the first place. A few simple ways to do so is to:
  • Imagine you are just a regular web user and run a few searches using the keywords you plan to use in your ad campaign. What kinds of ads show up? What texts does your competitor use and what product benefits do they highlight?
  • Paste your website URL to SimilarWeb and review the list of suggested similar websites. Hop to your competitors’ websites and jot down the prices, delivery terms, usability, page layout etc.

Analyze Seasonality

Google Trends is a fast, easy and free tool to understand what’s bugging your customer today and if your product will stay in demand in half a year timespan. Using this service you can:
  •  Identify trending search terms and various topics popularity.
  • Analyze seasonality in your niche.
  • Understand which regions have the most interested potential customers.
Don’t forget, your personal insights and expertise can be incredibly helpful for launching result-driven an ad campaign.

Prepare Your Elevator Speech

At this point you should have some understanding of your competition and what your target audience needs. Now, think of a very unique offer that may hook up those peeps.Perry Marshall, author of “Ultimate Guide to Google AdWords: How to Access 1 Billion People in 10 Minutes”, suggests using the elevator speech technique: imagine that you have just 15 seconds to present your product to a stranger you are sharing a ride with in an elevator. What will you tell them? Make a list of your product’s key advantages and unique selling points.

You can learn more about pitching in our how-to guide "The Step by Step Guide to Getting Free Press for Your Startup".

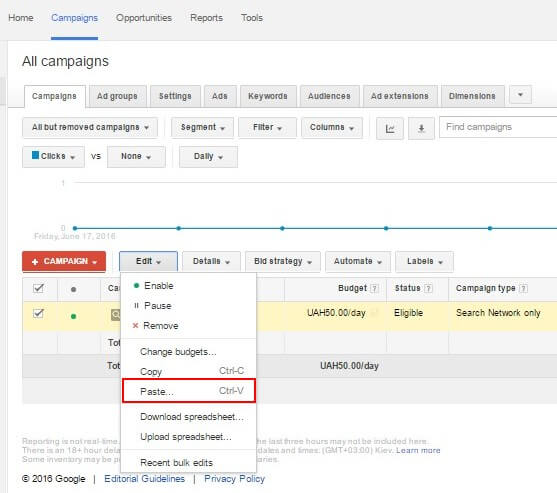
Plan Your Account Structure

To avoid your Google AdWords account looking really cluttered, plan out how you’ll organize your campaigns in advance based on the various topics and keywords you plan to target.

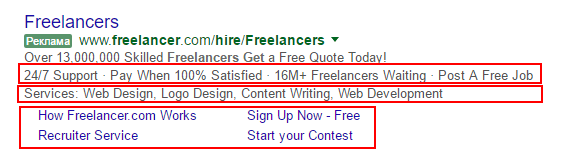
All the ads are grouped, hence if you’d like to have different texts say for red and black dresses from your website, use the respective filters to separate those.
Different campaigns help you to manage costs more efficiently and create ad groups based on different criteria. For e-commerce websites most commonly that’s the product category; for service websites that would be one type of a service.
Here’s a quick example for a freelance marketplace.

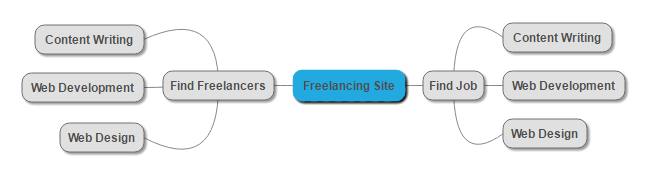
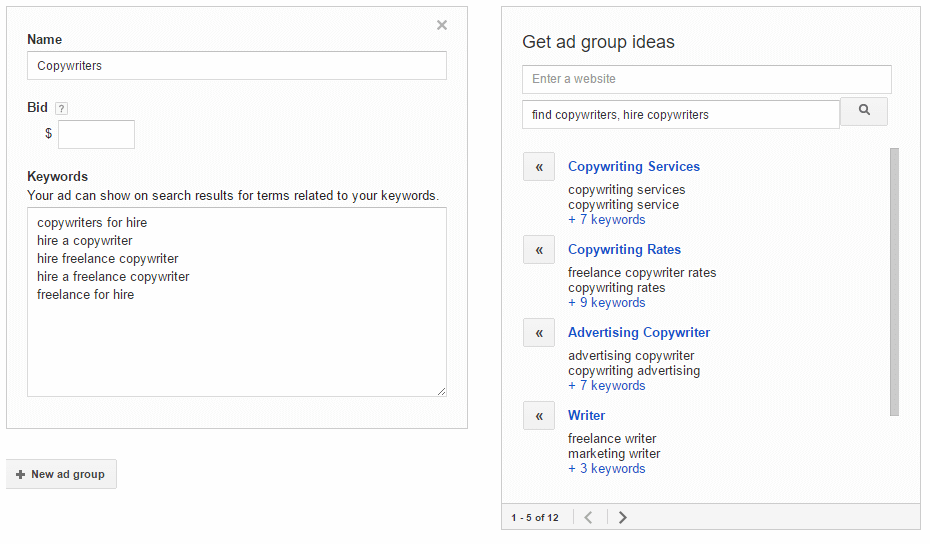
The first campaign will target those users, who are searching for freelancers, and suggest different ad groups based on the kind of a specialist in question. The second type of ad groups, targeting people who search for work, should be divided the same way. This way you can create relevant ad texts for each group and quickly identify which campaign is getting better results.

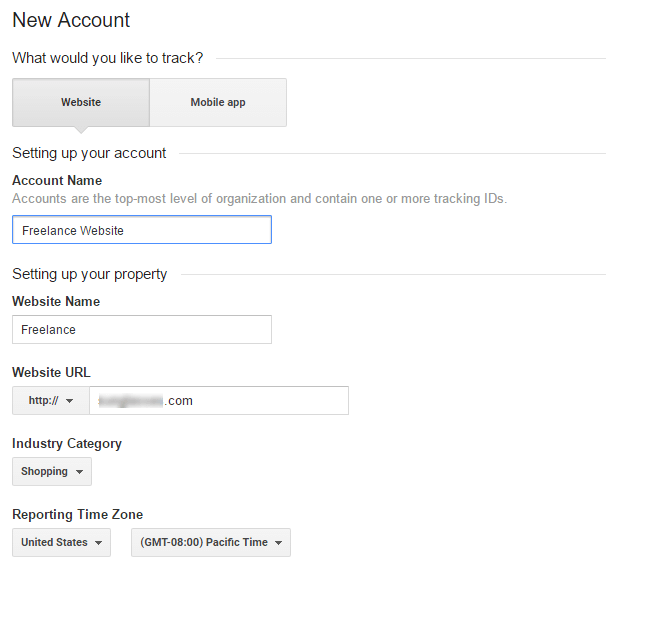
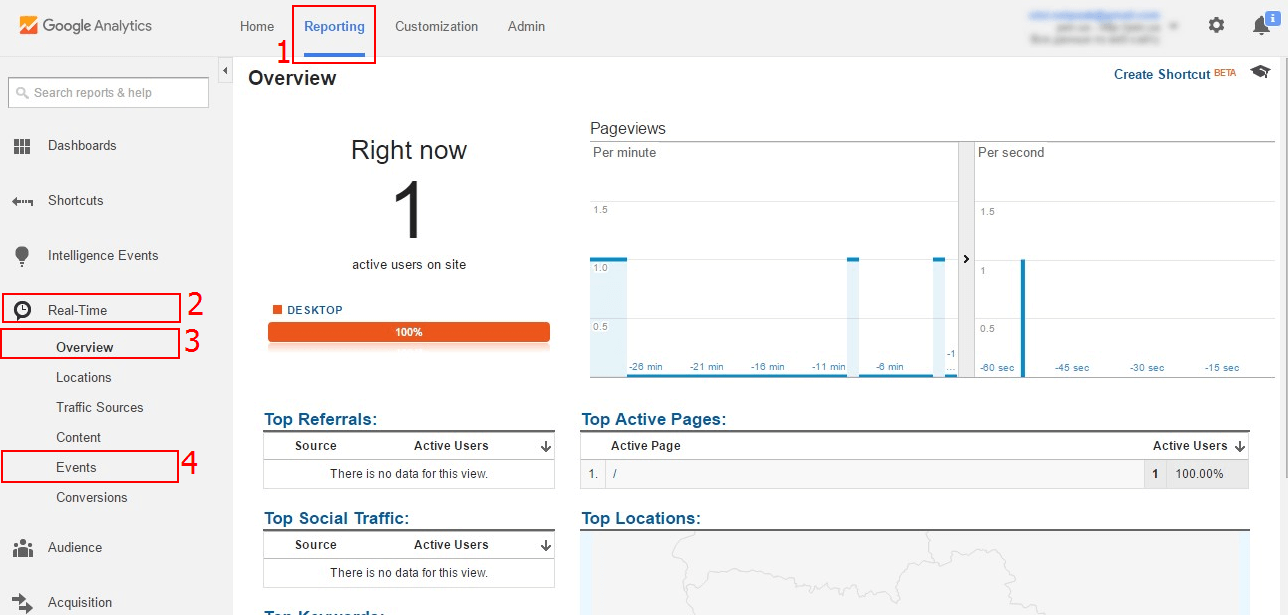
Create a Google Analytics Accounts

What’s the most important thing to do when you are paying for every single click? Squeeze as many insights as possible from the traffic you are getting, including user behavior patterns; goals reached and compare the quality of paid and organic traffic.That’s why you should setup your Google Analytics account prior to creating a PPC campaign.If you have never worked with Google Analytics before, you should start with registering an account – it’s quick and easy.Follow this link and login using your Google account. Next, add all the requested details about your website.
Choose what would you like to track with your Analytics account: a website or a mobile app.
Add your custom Account and Website name. Those should be easy-to-remember and convenient for further usage. If you run a few websites—your main site and a mobile website/mobile app—you should create separate accounts for each of them. It will save you tons of time to figure out which one you are dealing with now. Your default website URL. Choosing Industry Category isn’t compulsory. However it’s best to choose the most relevant niche as you’ll be offered custom templates for it later on when you’ll be setting up Goals. Setup the correct country and time zone. All the information gathered by your analytics will be displayed accordingly. You can change these later, but the new changes will not impact the previously gathered data and things may get messy.

Add Tracking Code

Next, you need to copy the generated tracking code and install it on your website.Choose Admin tab and choose Tracking Info – Tracking Code in Property tab.
Copy the tracking code and install it for all website pages.
If you already have Google Tag Manager installed on your website, setting up Google Analytics will take just a few clicks. Create a new tag in Choose Product tab, choose Google Analytics; Tag Type – Universal Analytics.
Copy ID Google Analytics to Configure Tag field.
Choose to activate the tag on all pages, save the settings and don’t forget to hit publish changes.

Setup Goal Tracking

Goals are the custom metrics, which heavily depend on your site’s niche and monetization strategy. In general, you should track the following goals:
  • Sale
  • One-click sale
  • Callback requests.
 And possibly secondary ones like:
  • Newsletter subscription
  •  Account registration
  •  Product added to the cart w/o checkout
  • CTA interactions e.g. using “request a quote” form; “Download eBook” etc.
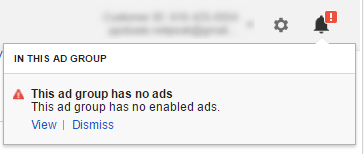
 You can learn more about the goals at Google Analytics Help Center.

Check Your Settings

You can easily verify if the installed GA code is functioning properly and your goals are tracked correctly in real-time.Open your website and open Google Analytics in another browser tab. Switch to Reporting tab and choose Real-Time. In Overview screen you can review if your visit is being tracked.
Next, you can verify your goals. Get on your website and try performing all the tracked actions, which you’ve set up earlier in goals. You can check if the data is transferred correctly to GA by reviewing all the information about these events in Events tab.

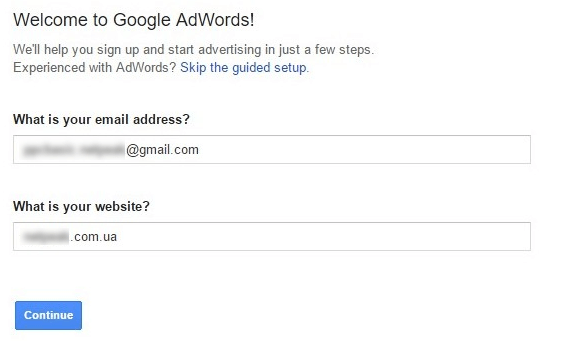
Create Your Google AdWords Account.

Follow this link and click “Start now” to complete account registration in 4 easy steps:
1.     Enter your email and website domain.
2.     Next, AdWords will suggest creating your first campaign. We’ll walk you through all the settings a bit later, so simply add some random info to continue with the registration IMP: The only field that matters now is Your Budget, and, more importantly, the currency you’ll choose.
3.     At this step choose your country, enter all the requested details about your company and your payment details.4.     During the last step re-check all the important fields:
  • Currency;
  • Time zone;
  • Payment details.
Once you are done, delete the test campaign you’ve created. Switch to Campaign tab and select your campaign. Now click Edit and choose Delete from the dropdown menu.

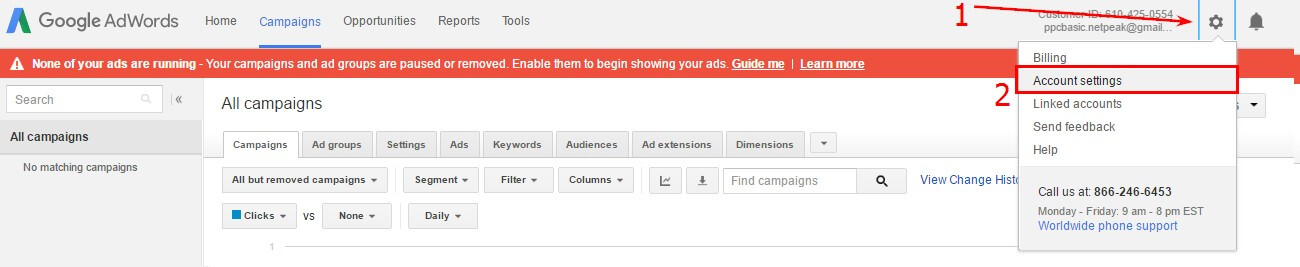
Link AdWords to Google Analytics

You now have two accounts: Google Analytics and Google AdWords. Now, you should connect them to one another. What for? Well, in this case you’ll be able to:
  • Monitor user behavior analytics in AdWords.
  • Import setup Goals from GA to AdWords.
  • Remarket to the audiences you’ve chosen in Google Analytics.
Here’s how it’s done:
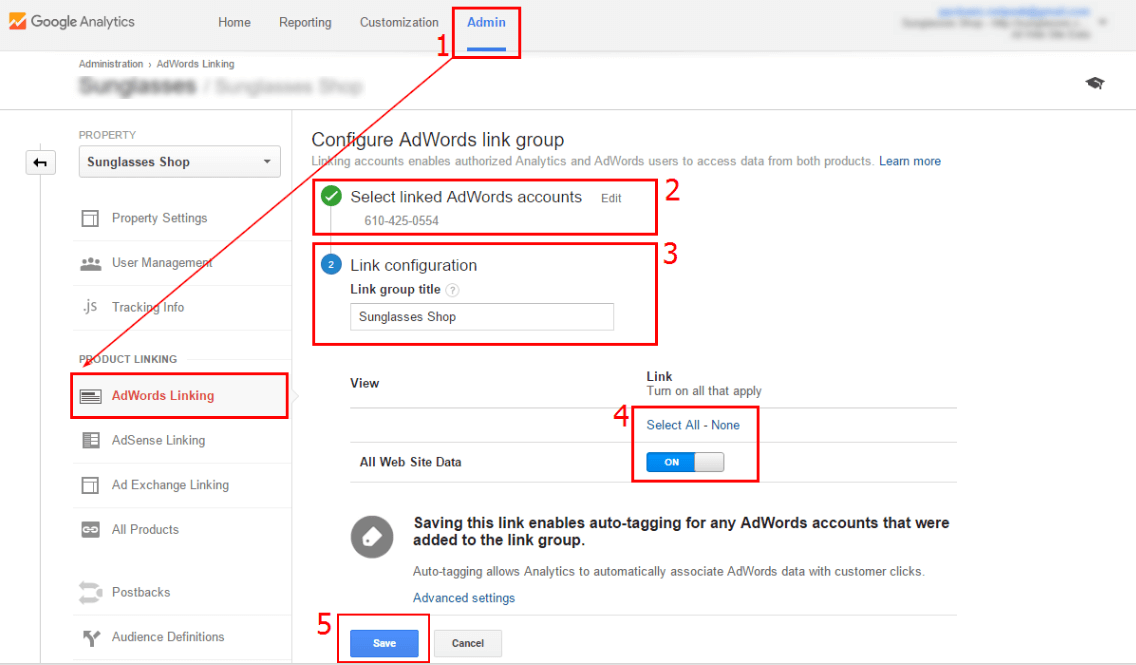
  • Open Admin tab in GA. In Property tab choose AdWords Linking.
  • Choose the AdWords account you wish to connect.
  • Add a custom name for the accounts you’ve just interlinked.
  • Choose Select All to review all the GA data, which will now be displayed in AdWords reports.
  • Save everything.

Import Goals To Google AdWords

Here’s the last step you need to do in order to establish the full connection between the two accounts:1.  Open your AdWords account and click the cog in the upper right corner. Choose Account Settings from the dropdown menu.

2.  Switch to Linked Account – Google Analytics tab.

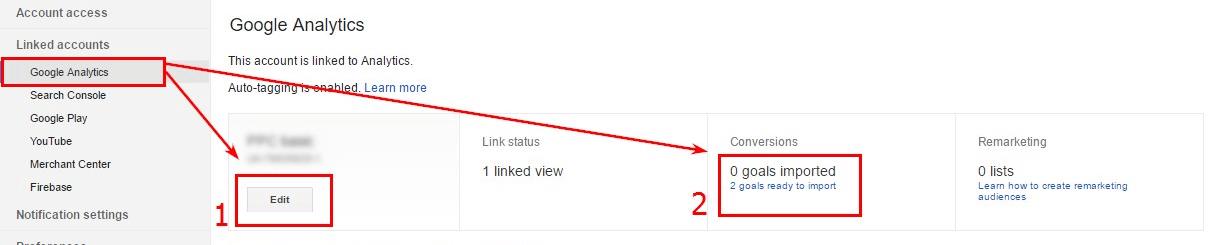
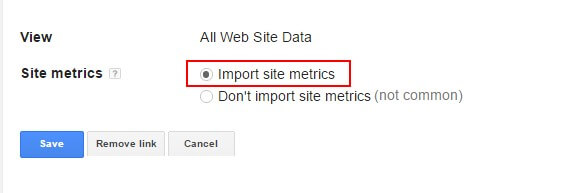
3.  Choose Import site metrics feature to receive user behavior stats.

4.  Select the Two Goals Ready To Import text and choose the goals you need to track in the new screen.

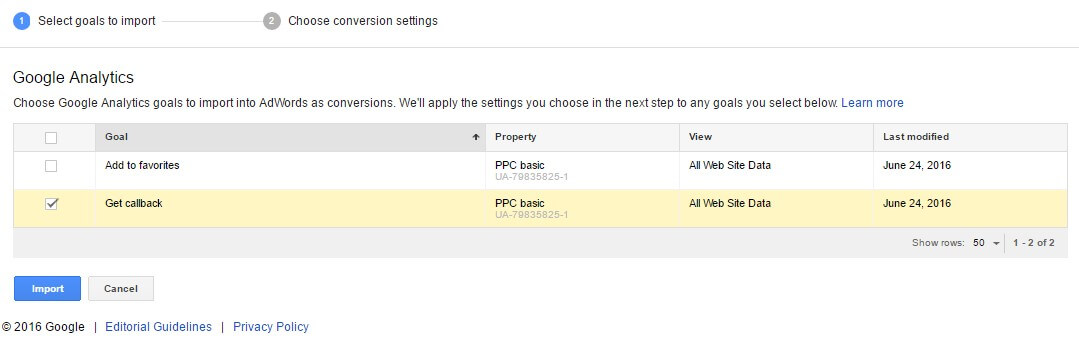
5.     Now you should have an option to choose to import conversions.
Pay attention to the additional value setup functionality: 
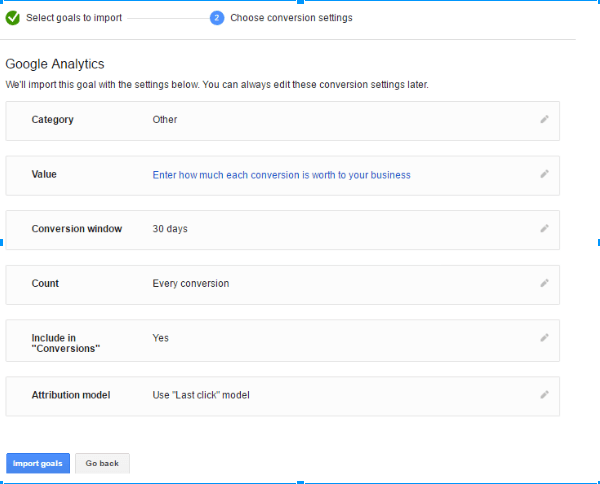
  • You can choose to add the same value for all events.
  • The value is set up based on Google Analytics data (suitable for ecommerce websites if you have respective tracking on)
  • Don’t add any values.
Now, we are finally done with all the ad campaign preparations.

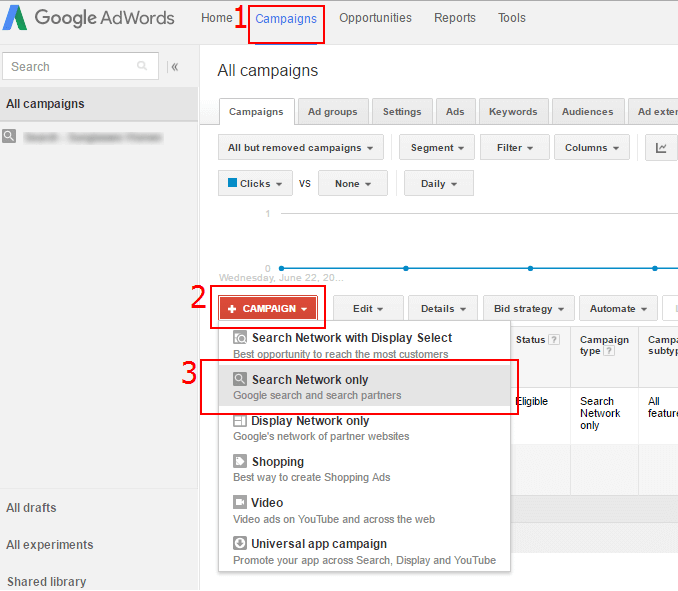
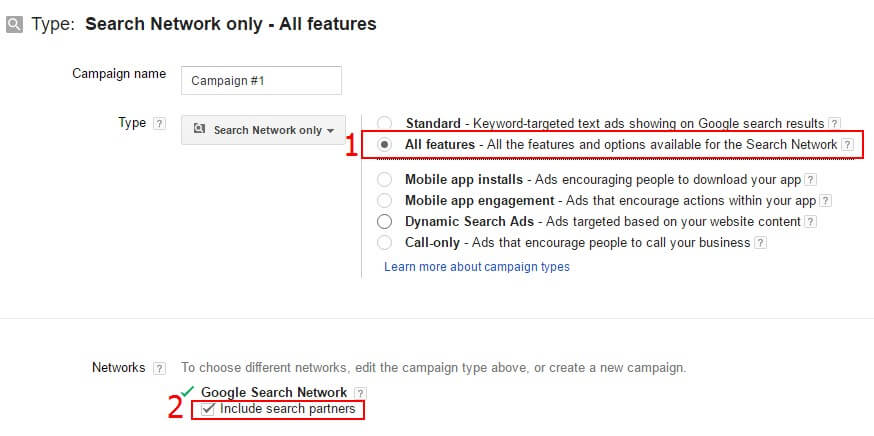
Create a Search Ad Campaign

Let's create a search ad campaign, which will display your ads to users searching for related products or services in Google.In Campaigns tab, choose +Campaign. Choose Search Network only campaign from the dropdown menu.

Be Very Attentive With All The Ad Settings

During the initial setup you’ll model exactly how your campaign will work out. Each tick can be very important.  Let's take a closer look on the whole process:Don’t forget about the data structure you’ve created earlier. You ad campaign name should help you further on. For instance, you can make up something like Search — Find Freelancers – a name indicating that this is a search campaign for a specific segment of your website.1.     Choose All Features campaign to get the most flexible settings.2.     Tick “Include Search Partners” to get a wider audience reach.

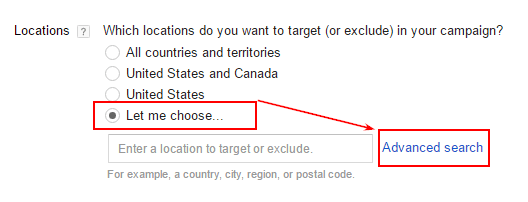
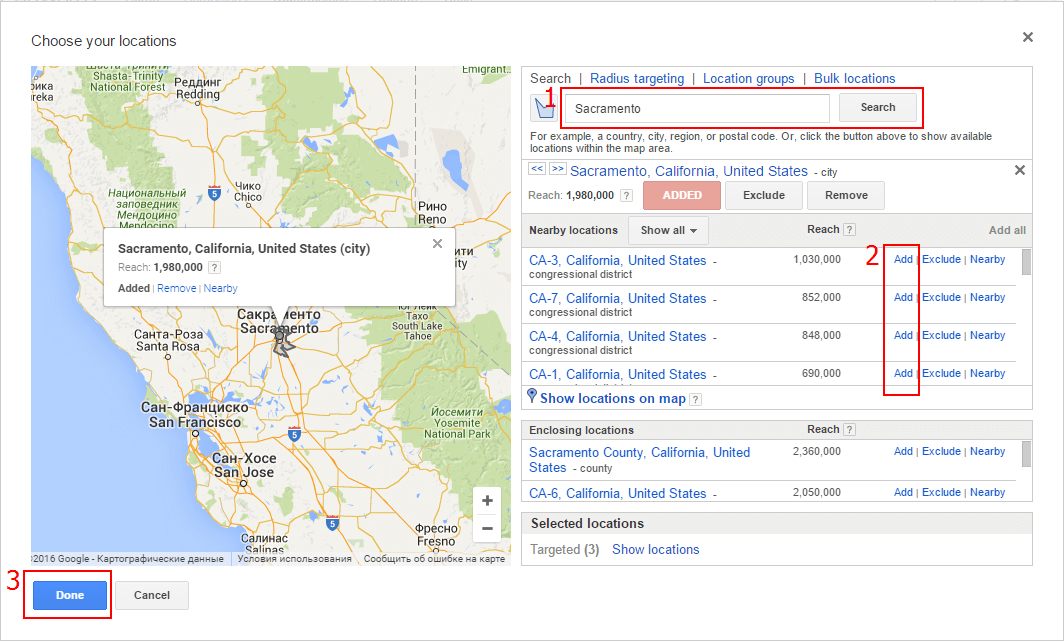
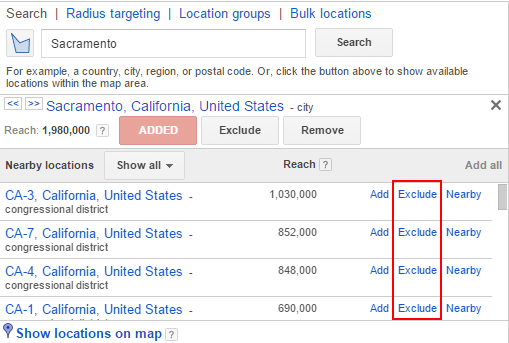
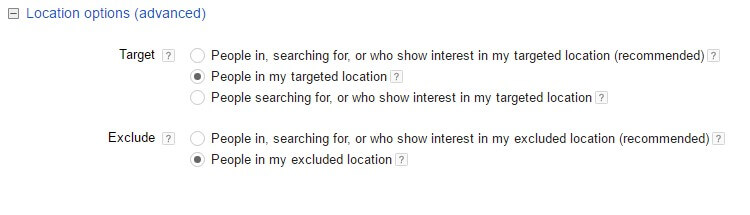
Choose The Region For Targeting

To select the best region, where your ads should be displayed, take the next factors into account:
  • Your budgets;
  • Product/Service demand;
  • Competition.
If you are on a limited budget, you should better target cities where you can offer additional benefits to the customers (e.g. same day delivery, in-store pickups etc.) or regions with lower competition.AdWords will automatically suggest global targeting or your home country. You can also use Advanced search to refine the regions:
This features allows you to assign a very specific location, set up geo-targeting on a map or choose to ran ads only within a certain area close to your storefront.
Also, Advanced search allows you to exclude displaying ads in certain regions. Just click “Exclude” next to a certain area.
Another important point: if you’d like to display ads only in a selected region, tick “People in my target location”. If you’d like to have the max reach and you don’t care about your user’s location, choose the first suggestion.
Language is another targeting option. If you chose very specific geo-targeting, it’s not worth narrowing it down even further by choosing to target only specific languages. For instance, if you select English only, your ads won’t be seen by a student who’s switched his browser default language to Portuguese for some language practicing or expats living in the area.
And, on the contrary, if you chose global targeting, selecting a specific language should deliver you better traffic.

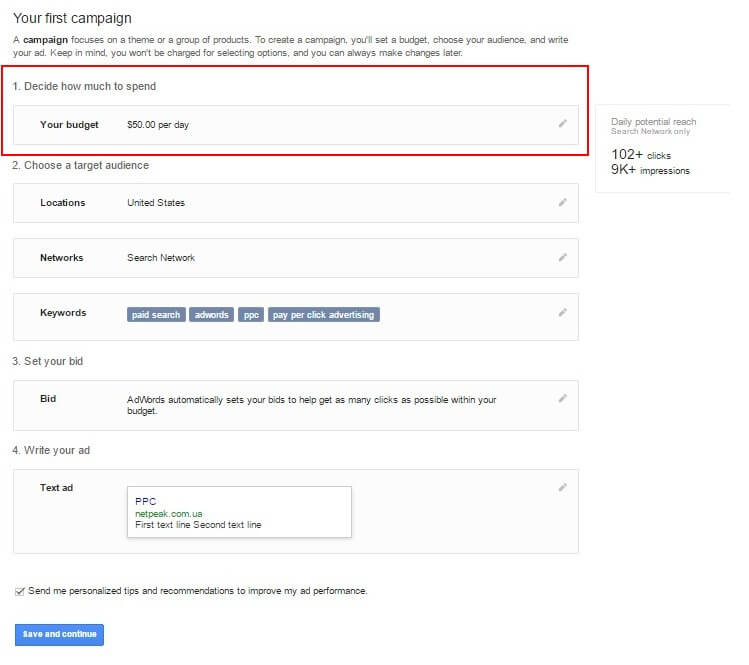
Setup Budget and Bids

Next, let's decide how much we will spend on AdWords. This is one of the crucial setup steps.
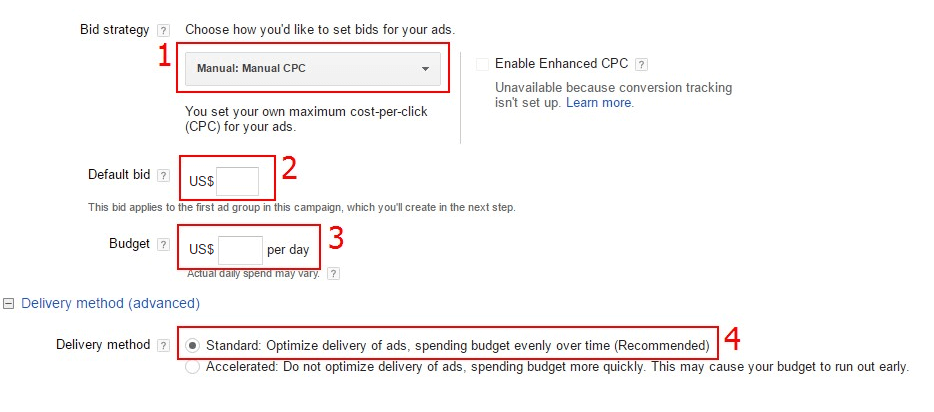
  1. For your first campaign, it’s best to select manual bidding, as your AdWords analytics doesn’t have enough stats yet to propose decent auto-bidding.
  2. Here you should select a default bid for your first ad group. You’ll need to determine the average bid price, which you feel comfortable paying and which is competitive enough in your niche.
  3. Add daily spending limit. Note: your daily budget can still be exceeded, but not more than by 20%.
  4. Delivery Method feature will allow you to choose between the standard and accelerated ad display.

Do Use Advanced Ads Feature

Now let's talk about how you can make your ads more attractive and clickable. Adding advanced settings is not compulsory and Google does not guarantee that those will be taken into account. However, such insignificant tweaks often draw more eyes to your ads.
Here are a an example of how advanced ads look like:

Setup When and How Your Ads Will Be Displayed

You are almost done with your ad campaign! One the final stages is to setup ad scheduling.
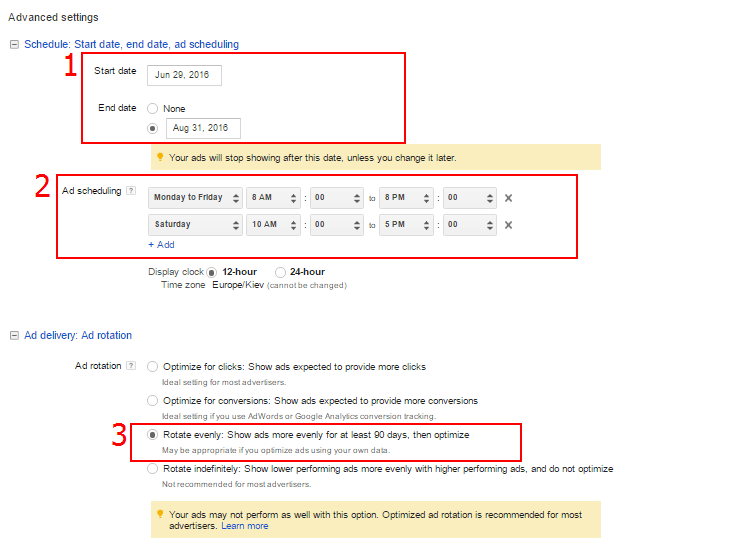
  1. You can setup the start and end date for your campaign. Works great for seasonal promos.
  2. If you wish the ads to be displayed only during your business hours, include those times to the scheduler.
  3. Here you can also setup how AdWords will pick a particular ad from the group to display to the user. When launching the first campaign, it’s best to choose even rotation.

Create Your First Ad Group

When creating an ad group it’s important to give it a proper name, craft add texts and choose target keywords.

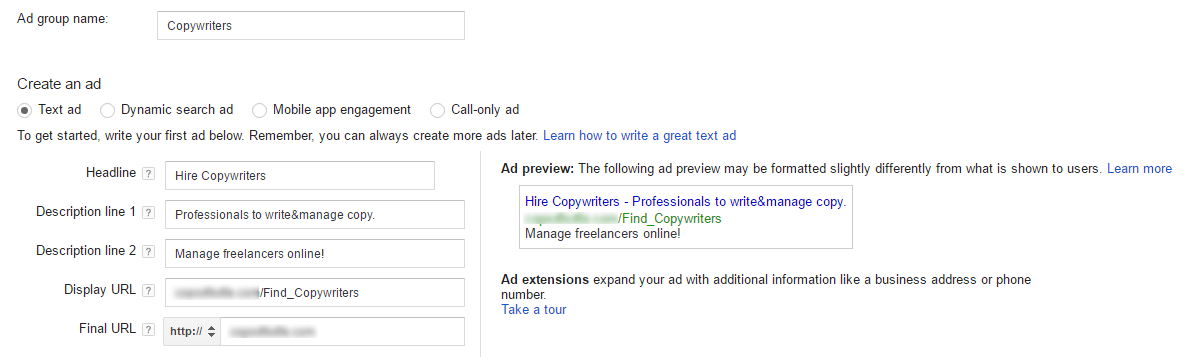
To accomplish this, take another look on your list of your unique selling points and add them to the text of the ad. Prices, promo info, exclusive deals – all of this can be mentioned in the copy.
Your ad copy can be creative or formal and informative. It all depends on you niche, your goals and target audience.I’ll go one step forward and mention that you should create at least two ad texts for one group to split test those and understand which brings you better results.

Add Keywords

Add a few search terms and AdWords will suggest you additional ideas for targeting:
You can use Google Keyword Planner to analyze different keywords, their popularity, competition and some additional data. Click on Tools tab and choose Keyword Planner from the dropdown menu.

Choose The Best Matching Keywords

To capture quality leads with your ads, it’s not enough to target just some keywords. You should pick the best matching ones. Here are the most common options:
  1. Broad match means that your ads will be displayed for a vast range of related keywords to ensure max visibility e.g. misspelled keywords, keywords within various phrases, with reversed word order etc. This type of matching is worth using when you need to attract the max amount of traffic possible, or you are operating in a very narrow niche.
  2. Broad match modifier. This option allows you to be more restrictive around the specific search queries that will trigger you ad. Those can be still misspelled words and so on; but you can refine the results by adding a “+” to the specific work you’d like to lock in place within your keyword phrase. For instance if you choose “+women gloves”, Google will run you ad for related searches like “women accessories”, “gloves for women”, “women clothing”, but will not display the ad for “men gloves”.
  3. Phrase match. You can setup your ad to only appear when a user searches for your exact keyword, in the exact order, but with some additional words added to the search query. To enable this, place your keyword in “quotations”. For instance, your ads will show up for “white women gloves” or “warm women gloves”, but not “gloves for women” or “women’s white gloves”.
  4. Exact match restricts your ads display to only those cases when a user types your exact keyword phrase. To enable this placed your keyword in [square brackets]. In this case your ad reach decreases significantly, but you are reducing the amount of irrelevant search queries as well.

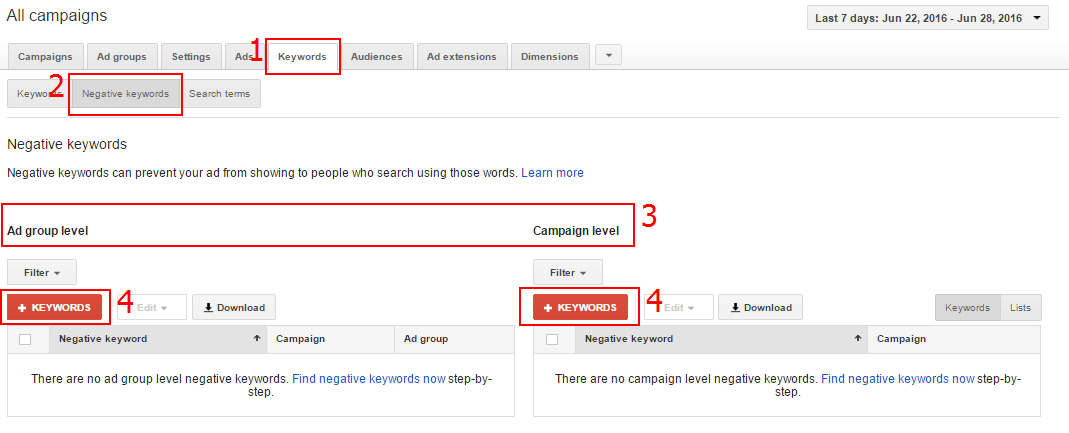
List Negative Keywords

This is another important step, which will help you to avoid being displayed for irrelevant keywords and wasting your budgets.Pay special attention here if you previously chose broad match. To create a list of negative keywords, analyze all the suggested keywords in Keyword Planner and weed out the irrelevant terms for instance “free”, “used”, “photo”, “watch”, the list of brands or goods you don’t sell etc.Jot down the list and add it to your campaign.Open Keywords tab and choose Negative Keywords. Select negative keywords for one of your ad groups or campaigns and add those negative keywords using +Keywords button.

Analyze and Optimize

Pay attention to Google AdWords hints. The system will let you know when, for instance, a negative keyword blocks the target keyword; when you forgot to add keywords to a certain group or campaign; when your daily budget is insufficient to display the ad etc.
You can also review all the additional suggestions in Opportunities tab.
However, don’t blindly accept all the offers heading your way. Stay critical and an analyze whether this action will have a positive impact on your project. 
Story by
Valery Krasko
Head of PPC and PPA @ Netpeak